The Brother MFC7820N is quite an old all-in-one mono laser printer, colour scanner and fax machine. The one I have is about 15 years old now, but still works fine. You can still get toner, drums and other spares for it.
I have used the network scanning functionality with Linux previously, but a long time ago now, on one of my previous laptops. I needed to get it working on my current laptop, which is running Ubuntu 22.04 LTS.
Note: I have not tried USB scanning.
You can still download drivers from Brother, including ones for Linux. They were produced ~10 years ago, but still seem to work fine, with some tweaks.
Installation and Set Up
Ubuntu has a Wiki page on the MFC7820N, which more or less works. These instructions are adapted from the Ubuntu Wiki page.
You will need to download the drivers from Brother (see link above). After downloading the drivers, I ran these commands:
# Switch to root for installing packages:
sudo -s
su -

# Install pre-requisites for scanning:
apt-get install sane-utils xsane

# Install Brother scanning driver for SANE:
dpkg -i brscan2-0.2.5-1.amd64.deb

# Change the IP address below!
brsaneconfig2 -a name=SCANNER model=MFC-7820N ip=1.2.3.4
You can verify that the scanner has be set up correctly using the following command. Note that it may take a while. I think it scans for other devices.
# scanimage -L | grep -i brother
device `brother2:net1;dev0' is a Brother MFC-7820N SCANNER
Moving Brother libraries for SANE
The location for SANE libraries has moved since the Brother drivers for SANE were packaged. The Ubuntu Wiki talks about moving files from /usr/lib64 to /usr/lib, and from /usr/lib64/sane to /usr/lib/sane, but those are not the correct paths anymore. Additionally, the symlinks provided by the Brother driver package use absolute paths, which are also not correct anymore.
To resolve this, first of all copy the libraries into their new locations:
# Still as root:
cp -av /usr/lib64/libbr* /usr/lib/x86_64-linux-gnu
cp -av /usr/lib64/sane/libsane-brother2.so* /usr/lib/x86_64-linux-gnu/sane
And then fix the symlinks:
# Still as root:
cd /usr/lib/x86_64-linux-gnu
ln -sf libbrcolm2.so.1.0.1 libbrcolm2.so.1
ln -sf libbrcolm2.so.1 libbrcolm2.so

cd /usr/lib/x86_64-linux-gnu/sane
ln -sf libsane-brother2.so.1.0.7 libsane-brother2.so.1
ln -sf libsane-brother2.so.1 libsane-brother2.so
Scanning with XSANE
You should now be able to start XSANE as a normal user.
Firstly, make sure your printer/scanner is turned on. For some reason, the XSANE window does not appear if there is no scanner turned on, which is pretty confusing!
You can run it like this from a terminal window:
xsane &
or Windows key and then search for “XSANE”.
Once XSANE starts, you should be able to see a window as shown below. You can switch between the automatic document feeder and flat bed.
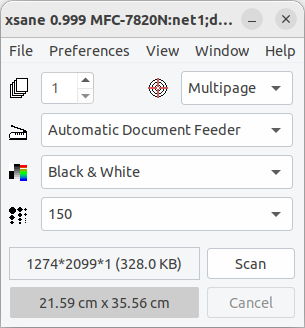
In this case, I’ve switched the scanning mode to Multipage, to scan multiple pages at once. If you’ve used Preview on macOS, you may find this confusing, but I think it’s more powerful. It will create a project directory for you, and store individual pages in there. You can then combine them into a PDF file, which is stored in the directory above with the same filename plus .pdf. Troubleshooters.com: Scanning to PNM, then Concatenating to PDF goes through how this process works.